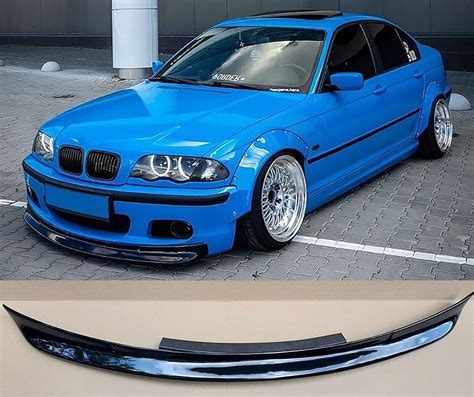
Upgrading your BMW E46's front bumper to an M Tech 2 design can be a fantastic way to enhance the car's aesthetic appeal and aerodynamics. The E46, produced from 1998 to 2006, is a highly regarded model in the BMW lineup, known for its exceptional handling and performance capabilities. The M Tech 2 front bumper, inspired by the aggressive styling of BMW's M series cars, offers a more aggressive and sporty appearance that complements the E46's dynamic character.
For many BMW enthusiasts, upgrading the front bumper to an M Tech 2 design is a popular modification that can significantly improve the car's visual impact. Not only does it enhance the car's overall appearance, but it also demonstrates the owner's attention to detail and commitment to personalizing their vehicle. In this comprehensive guide, we will walk you through the process of upgrading your BMW E46's front bumper to an M Tech 2 design, including the necessary steps, required tools, and valuable tips to ensure a successful installation.
Why Upgrade to an M Tech 2 Front Bumper?
Before we dive into the installation process, it's essential to understand the benefits of upgrading to an M Tech 2 front bumper. Here are some compelling reasons to consider:
- Enhanced Aesthetics: The M Tech 2 front bumper features a more aggressive and sporty design, which complements the E46's dynamic character. The new bumper will give your car a fresh and modern appearance that's sure to turn heads.
- Improved Aerodynamics: The M Tech 2 front bumper is designed to improve airflow and reduce drag, which can enhance the car's overall performance and handling capabilities.
- Increased Durability: The M Tech 2 front bumper is made from high-quality materials and is designed to withstand the rigors of everyday driving.
Tools and Materials Required
Before starting the installation process, make sure you have the following tools and materials:
- M Tech 2 front bumper: Ensure you have purchased a genuine BMW M Tech 2 front bumper or a high-quality aftermarket alternative.
- Socket set: A comprehensive socket set will be necessary for removing the old bumper and installing the new one.
- Torque wrench: A torque wrench will be required for tightening the bolts and screws to the specified torque values.
- Drill and bits: A drill and bits may be necessary for making adjustments or modifications to the new bumper.
- Trim removal tools: Trim removal tools will be necessary for removing the old bumper's trim and installing the new one.
- Adhesive and sealants: Adhesive and sealants may be necessary for securing the new bumper in place.
Step-by-Step Installation Guide
Installing an M Tech 2 front bumper on your BMW E46 requires patience, attention to detail, and basic mechanical skills. Here's a step-by-step guide to help you through the process:
Step 1: Remove the Old Bumper
- Start by removing the old bumper's trim and screws using a trim removal tool and a screwdriver.
- Use a socket set to remove the bolts that secure the old bumper to the car's frame.
- Gently pull the old bumper away from the car's frame, taking care not to damage any surrounding components.
Step 2: Prepare the New Bumper
- Inspect the new M Tech 2 front bumper for any damage or defects.
- Clean the new bumper thoroughly to remove any dirt, dust, or debris.
- Apply a layer of adhesive to the new bumper's mounting points, if required.
Step 3: Install the New Bumper
- Align the new bumper with the car's frame, ensuring it's properly seated and centered.
- Use a socket set to secure the new bumper to the car's frame, tightening the bolts to the specified torque values.
- Use a drill and bits to make any necessary adjustments or modifications to the new bumper.
Step 4: Install the Trim and Screws
- Install the new trim and screws, ensuring they're properly secured and aligned.
- Use a trim removal tool to adjust the trim's fit and ensure it's properly seated.
Tips and Tricks
Here are some valuable tips and tricks to help you through the installation process:
- Take your time: Installing an M Tech 2 front bumper requires patience and attention to detail. Take your time to ensure a successful installation.
- Consult the manual: Refer to your BMW E46's repair manual for specific instructions and guidelines for installing the M Tech 2 front bumper.
- Seek professional help: If you're not comfortable with the installation process, consider seeking professional help from a qualified mechanic or body shop.

Gallery of BMW E46 M Tech 2 Front Bumper Upgrades


Conclusion
Upgrading your BMW E46's front bumper to an M Tech 2 design is a fantastic way to enhance the car's aesthetic appeal and aerodynamics. By following this comprehensive guide, you'll be able to successfully install the new bumper and enjoy the benefits of a more aggressive and sporty appearance. Remember to take your time, consult the manual, and seek professional help if necessary. Happy modifying!
What are the benefits of upgrading to an M Tech 2 front bumper?
+The benefits of upgrading to an M Tech 2 front bumper include enhanced aesthetics, improved aerodynamics, and increased durability.
What tools and materials are required for the installation?
+The required tools and materials include a socket set, torque wrench, drill and bits, trim removal tools, and adhesive and sealants.
How long does the installation process typically take?
+The installation process typically takes several hours, depending on the individual's level of mechanical expertise and the complexity of the installation.
