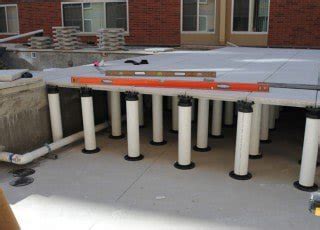
Tile Tech Pedestal Installation has become a widely accepted method for creating elevated decks, roof decks, and balconies. This innovative system offers numerous benefits, including improved drainage, reduced weight, and enhanced structural integrity. However, to fully harness the potential of Tile Tech Pedestal Installation, it's essential to master the installation process. In this article, we'll guide you through the 7 steps to achieve expertise in Tile Tech Pedestal Installation.
Understanding the Tile Tech Pedestal System
Before diving into the installation process, it's crucial to understand the components and functionality of the Tile Tech Pedestal System. The system consists of adjustable pedestals, anti-shock pedestals, and fixed pedestals, each designed to provide a specific solution for various installation requirements. Familiarizing yourself with the different types of pedestals, their features, and applications will help you make informed decisions during the installation process.

Step 1: Preparation and Planning
A successful Tile Tech Pedestal Installation begins with thorough preparation and planning. This step involves assessing the installation site, determining the required pedestal type and quantity, and preparing the necessary tools and materials. It's essential to ensure the site is level, clean, and free of debris to prevent any obstacles during the installation process.

Key Considerations for Preparation and Planning:
- Assess the site's drainage requirements and determine the necessary pedestal height and type.
- Calculate the required pedestal quantity and spacing.
- Prepare the necessary tools, including a level, tape measure, and safety gear.
- Ensure the site is clean, level, and free of debris.
Step 2: Laying the Pedestals
With the site prepared and the pedestals selected, the next step is to lay the pedestals according to the planned layout. This involves placing the pedestals at the calculated spacing and ensuring they are level and secure. It's essential to follow the manufacturer's instructions for pedestal placement and adjustment.

Key Considerations for Laying Pedestals:
- Follow the manufacturer's instructions for pedestal placement and adjustment.
- Ensure the pedestals are level and secure.
- Use a level and tape measure to verify the pedestal spacing and layout.
Step 3: Adjusting the Pedestals
Once the pedestals are laid, the next step is to adjust them to the required height and ensure they are level. This involves using the pedestal's adjustment mechanism to fine-tune the height and levelness.

Key Considerations for Adjusting Pedestals:
- Use the pedestal's adjustment mechanism to fine-tune the height and levelness.
- Ensure the pedestals are securely locked in place.
- Verify the pedestal height and levelness using a level and tape measure.
Step 4: Installing the Decking Surface
With the pedestals adjusted and secured, the next step is to install the decking surface. This involves placing the decking material, such as tiles or pavers, onto the pedestals and ensuring they are securely fastened.

Key Considerations for Installing the Decking Surface:
- Ensure the decking material is securely fastened to the pedestals.
- Use the manufacturer's recommended fastening system.
- Verify the decking surface is level and secure.
Step 5: Adding Finishing Touches
The final step is to add the finishing touches to the installation. This involves installing any necessary trim, flashing, or other accessories to complete the installation.

Key Considerations for Adding Finishing Touches:
- Ensure all necessary trim, flashing, and accessories are installed.
- Verify the installation meets the manufacturer's requirements and local building codes.
- Inspect the installation for any defects or deficiencies.
Step 6: Inspecting and Testing
Before completing the installation, it's essential to inspect and test the system to ensure it meets the required standards. This involves verifying the pedestal height, levelness, and security, as well as testing the decking surface for any defects or deficiencies.

Key Considerations for Inspecting and Testing:
- Verify the pedestal height, levelness, and security.
- Test the decking surface for any defects or deficiencies.
- Ensure the installation meets the manufacturer's requirements and local building codes.
Step 7: Maintenance and Upkeep
The final step is to ensure proper maintenance and upkeep of the Tile Tech Pedestal Installation. This involves regularly inspecting the system, cleaning the pedestals and decking surface, and performing any necessary repairs or replacements.

Key Considerations for Maintenance and Upkeep:
- Regularly inspect the system for any defects or deficiencies.
- Clean the pedestals and decking surface regularly.
- Perform any necessary repairs or replacements.
By following these 7 steps, you'll be able to master the Tile Tech Pedestal Installation process and ensure a successful and long-lasting installation.


What are the benefits of using Tile Tech Pedestal Installation?
+The benefits of using Tile Tech Pedestal Installation include improved drainage, reduced weight, and enhanced structural integrity.
How do I determine the required pedestal type and quantity for my installation?
+To determine the required pedestal type and quantity, assess the site's drainage requirements and calculate the necessary pedestal height and spacing.
What is the importance of regular maintenance and upkeep for Tile Tech Pedestal Installation?
+Regular maintenance and upkeep are crucial to ensure the longevity and performance of the Tile Tech Pedestal Installation.
We hope this article has provided you with a comprehensive guide to mastering Tile Tech Pedestal Installation. By following these 7 steps and considering the key considerations for each step, you'll be able to ensure a successful and long-lasting installation. If you have any further questions or concerns, please don't hesitate to contact us.
