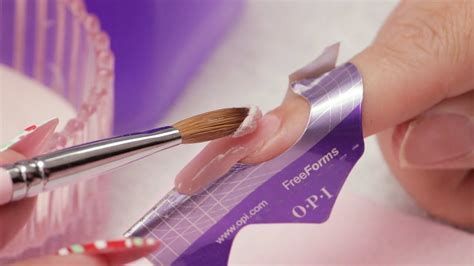
As a nail technician, providing excellent service to your clients is crucial for building a loyal customer base and growing your business. One of the most popular nail services is acrylic nail application, which requires a combination of technical skills, attention to detail, and creativity. In this article, we will delve into the essentials of acrylic nail application, providing you with a comprehensive guide to help you master this popular technique.
Why Acrylic Nails Remain a Popular Choice
Acrylic nails have been a staple in the nail industry for decades, and their popularity endures due to their durability, versatility, and affordability. Unlike natural nails, acrylics can withstand daily wear and tear, making them an excellent option for individuals with weak or brittle nails. Moreover, acrylics can be shaped, filed, and polished to create a wide range of designs, from classic and elegant to bold and trendy.
Pre-Application Preparation
Before applying acrylic nails, it's essential to prepare your client's natural nails and ensure a clean and safe working environment.
Natural Nail Preparation
To ensure a successful acrylic nail application, it's crucial to prepare your client's natural nails properly. This involves:
- Removing old nail polish and oils
- Shaping the natural nail to create a suitable surface for the acrylic application
- Pushing back the cuticles to prevent any oils or residue from interfering with the adhesive
- Wipe the nail surface with a lint-free wipe or cotton ball to remove any remaining oils or residue

Sanitization and Safety Precautions
Maintaining a clean and safe working environment is vital for preventing the spread of infections and ensuring a successful application. This involves:
- Sanitizing your tools and equipment with a disinfectant solution
- Wearing gloves to prevent the transfer of oils and bacteria from your skin to the client's nails
- Ensuring good ventilation in the workspace to prevent inhalation of fumes from the acrylic liquid
Acrylic Nail Application
Now that you've prepared your client's natural nails and sanitized your workspace, it's time to apply the acrylic nails.
Step 1: Apply the Nail Tip or Form
If your client wants to add length to their nails, you'll need to apply a nail tip or form. This involves:
- Selecting the right size and shape of nail tip or form for your client's natural nail
- Applying a small amount of nail glue to the back of the tip or form and attaching it to the natural nail
- Shaping and filing the tip or form to create a seamless blend with the natural nail

Step 2: Mix the Acrylic Liquid and Powder
To create the acrylic mixture, you'll need to combine the liquid monomer with the powder polymer. This involves:
- Following the manufacturer's instructions for the correct ratio of liquid to powder
- Mixing the liquid and powder together until you achieve a smooth, consistent paste
Step 3: Apply the Acrylic Mixture
With the acrylic mixture ready, it's time to apply it to the nail. This involves:
- Applying a small amount of the mixture to the nail surface, starting at the center and working your way out towards the tips
- Using a nail brush to shape and mold the acrylic into the desired shape
- Allowing the acrylic to dry completely before filing and shaping

Finishing Touches
Once the acrylic has dried, it's time to add the finishing touches.
Filing and Shaping
Using a nail file, gently shape and smooth out the acrylic to create a natural-looking curve.
Polishing
Apply a thin layer of clear top coat to seal the acrylic and add shine.

Common Challenges and Troubleshooting
As a nail technician, you may encounter some common challenges when applying acrylic nails. Here are some troubleshooting tips to help you overcome these issues:
- Lifting: If the acrylic lifts off the nail surface, it may be due to insufficient preparation or incorrect application. To prevent lifting, ensure the nail surface is clean and dry before applying the acrylic.
- Yellowing: If the acrylic yellows over time, it may be due to exposure to UV light or poor quality products. To prevent yellowing, use high-quality products and apply a UV-resistant top coat.


How long do acrylic nails last?
+Acrylic nails can last up to two weeks with proper care and maintenance.
Can I apply acrylic nails at home?
+While it's possible to apply acrylic nails at home, it's recommended to seek the help of a professional nail technician for best results.
How do I remove acrylic nails?
+Acrylic nails can be removed using a specialized drill or by soaking the nails in a acetone-based solution.
In conclusion, acrylic nail application is a popular and rewarding technique that requires attention to detail, creativity, and technical skills. By following the steps outlined in this guide, you'll be well on your way to becoming a skilled nail technician. Remember to always prioritize sanitation, safety, and client satisfaction to ensure a successful and enjoyable experience for both you and your clients.
